What to Do When Your AC Thermostat Stops Working
Urgent, step-by-step guide to diagnose and fix a non-working AC thermostat at home. Learn power checks, mode resets, wiring tips, and when to call a pro.

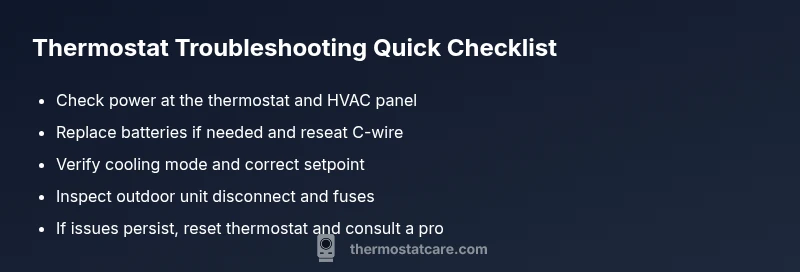
Most AC thermostat failures start with power or simple misconfigurations. Begin by verifying the thermostat screen is illuminated, replacing any old batteries, and confirming the unit is set to cooling with a realistic setpoint. If power checks don’t fix it, move to wiring and breaker inspections. Safety first—pull the disconnect if you suspect a fault.
Immediate power and mode checks
According to Thermostat Care, many AC thermostat outages are triggered by simple power issues or misconfigurations rather than a failing device. Start by visually confirming the thermostat display is lit and readable. If your model uses batteries, replace them with fresh alkaline cells and note the date for future reference. If it’s powered through the house wiring, ensure the 24-volt feed is present at the thermostat terminals, which often requires a quick check at the furnace or air handler.
Next, verify the thermostat mode is set to cool (not heat or auto) and that the setpoint is within a realistic range for your comfort needs. Make sure the fan is set to auto, not on. If you have a Wi‑Fi connected or smart thermostat, check that the app shows the same settings as the device and that there are no pending software updates or pending reconnections.
After these checks, inspect the HVAC system’s safety devices: trip breakers, a blown fuse, or a disconnected outdoor unit. A tripped breaker or blown fuse can cut power to the thermostat and the outdoor condenser, making it seem like a thermostat problem. If you discover a breaker issue, reset it and wait a minute to see if the thermostat responds. If you still can’t get a response, record the exact behavior and move to the next section for deeper checks.
Common misconfigurations that fool thermostats
Many problems masquerade as a non-working thermostat, when the real cause is how the device is configured. First, check whether the thermostat is stuck in hold mode; in that state, it won't respond to temperature changes until the hold is released. Then verify that the thermostat is not in a mode that bypasses cooling, such as an energy-saving or away setting. Some older models also default to Fahrenheit vs Celsius in a way that makes the numbers seem off; ensure the display reads the temperature you expect.
Next, review the scheduling settings. If the device is programmed to a distant future or to a schedule that never activates cooling, you’ll think it’s broken even though the system is fine. Confirm the temperature differential between the desired setpoint and the actual room temperature is reasonable. Finally, if you’re using a smart thermostat, confirm the Wi‑Fi connection is stable and that the app is not suppressing commands due to a pending update or cloud service outage. A quick toggle of power or a short re-pair can resolve many misconfigurations without touching wiring.
Diagnostic flow: symptom-to-diagnosis-to-fix
Use a simple, repeatable flow to determine the likely cause and the next step. Symptom: thermostat shows a blank screen or does not respond to any button. Diagnosis: power supply issue or blown fuse/tripped breaker is most likely; also inspect wiring for loose connections. Fix: reset the breaker, replace the batteries if needed, reseat the wire connections, and perform a factory reset if available.
Symptom: display is lit but commands do not register. Diagnosis: weak or loose wiring, especially the C-wire, or a failing internal relay. Fix: tighten terminals, re-seat wires at the furnace and thermostat, and test with a known-good battery if applicable. Symptom: thermostat responds intermittently. Diagnosis: app or firmware glitch, or flaky Wi‑Fi connection. Fix: reboot the thermostat, update the firmware, and re-establish the connection.
If the symptoms persist after these steps, the issue may be within the HVAC control board or the outdoor unit contactor. In that case, it’s time to escalate to professional service.
Prevention and maintenance tips to avoid future outages
To minimize repeats, schedule regular checks and keep spare batteries on hand. Periodically inspect the thermostat wiring for signs of wear, loose terminals, or corrosion, and replace damaged wire clamps. Clean the thermostat surface and ensure vents are unobstructed to prevent temperature swings that can confuse the controller. Consider upgrading to a thermostat with a backup power option or a more robust Wi‑Fi connection, especially if you experience frequent outages during storms or vacations. Maintain a simple daily routine: test the thermostat once a week by adjusting the setpoint slightly and confirming the HVAC equipment activates as expected. Finally, document changes you make and note any recurring issues so you can reference them during professional service.
Steps
Estimated time: 30-45 minutes
- 1
Power down safely
Turn off power at the main HVAC disconnect and at the breaker panel to ensure no voltage runs to the thermostat or outdoor unit while you inspect. Wait 60 seconds to discharge any residual power. Reconnect only after you have completed the checks.
Tip: Wear insulated gloves and use a non-contact tester to confirm no voltage before touching wires. - 2
Check display & wiring
Inspect the thermostat screen for brightness and readability. If batteries are present, replace with fresh ones. Re-seat R, C, Y, G, and W wires; tighten terminals and look for loose strands that could cause a short.
Tip: Label wires before removing them so you can return them to the correct terminals. - 3
Verify mode & setpoint
Set the thermostat to cooling, confirm the setpoint is below room temperature, and ensure the fan is on auto. If you’re using a smart thermostat, verify the app shows the same settings and that it’s online.
Tip: Take a photo of current wiring and settings before making changes. - 4
Check HVAC power & outdoor unit
Make sure the outdoor unit disconnect is on and fuses or breakers are intact. Listen for the relay clicking when cooling is commanded and watch for the condenser to start.
Tip: Do not touch live terminals; keep hands clear of the compressor and capacitors. - 5
Reset or re-pair
If the device supports it, perform a factory reset and re-enter your settings. Reconnect Wi‑Fi or the app as needed and ensure syncing completes without errors.
Tip: Have the user manual handy or a saved copy of settings to speed re-setup. - 6
When to call a pro
If the thermostat still won’t respond after the reset, or you notice burning smells, buzzing, or repeated breaker trips, stop DIY work and contact a licensed HVAC technician.
Tip: Document any error codes or behaviors to share with the technician.
Diagnosis: Thermostat display is blank or unresponsive
Possible Causes
- highPower supply issue (tripped breaker, blown fuse)
- mediumLoose or disconnected C-wire / battery connection
- lowThermostat firmware glitch or aging hardware
- lowHVAC control board or relay fault
Fixes
- easyCheck the HVAC disconnect and main breaker; reset if tripped. Verify 24V supply at thermostat terminals.
- easyInspect and reseat thermostat wiring, replace batteries, and ensure C-wire is secure.
- mediumPerform a factory reset or firmware update if the model supports it.
- hardIf the issue persists, arrange professional service to test the control board and outdoor unit.
Questions & Answers
Why is my thermostat display blank?
A blank display usually means a power or wiring issue. Start with power checks, replace batteries if needed, and verify the 24V supply at the thermostat. If it remains blank, proceed with the diagnostic flow.
A blank display usually means a power or wiring issue. Start with power checks and battery replacement, then verify the 24-volt supply. If it stays blank, follow the diagnostic steps.
My thermostat won't respond to changes.
Ensure the thermostat is not stuck in hold mode, confirm the system is set to cooling, and check for loose wiring. If it’s a smart model, verify app connectivity and firmware updates.
If it won’t respond, check hold mode, cooling setting, and wiring. For smart models, check the app and firmware.
Should I replace thermostat batteries?
If your thermostat uses batteries, replace with fresh ones and test again. If you still have issues, the problem may be wiring or the control board.
Yes, replace with fresh batteries and test. If issues persist, wiring or the control board may be at fault.
What safety steps should I take before DIY?
Always turn off power at the breaker before touching thermostat wiring. Use insulated tools and avoid contact with exposed conductors.
Turn off power at the breaker before touching any wires and use insulated tools.
Why is the AC not cooling after the thermostat works?
The issue may be with the outdoor unit, compressor, or refrigerant. Check thermostat settings first, then listen for outdoor unit activity. If the outdoor components aren’t functioning, call a pro.
If cooling doesn’t happen, check the outdoor unit and refrigerant issues. If the outdoor unit isn’t running, contact a pro.
When should I call a professional?
If you notice burning smells, buzzing noises, visible wiring damage, or repeated breaker trips, stop DIY work and hire a licensed HVAC technician.
Call a professional if you smell burning, hear buzzing, or see damaged wiring.
Watch Video
What to Remember
- Power and mode checks first, then wiring.
- Check for hold mode and correct cooling settings.
- Secure C-wire and inspect breakers before calling a pro.
- Call a licensed HVAC tech if you smell burning or hear buzzing.