Replace Thermostat with a Smart Thermostat: Step-by-Step Guide
Learn how to replace thermostat with a smart thermostat, with planning, wiring, app setup, and testing. A home-friendly guide for homeowners and DIY enthusiasts.

You can replace a traditional thermostat with a smart thermostat by confirming compatibility, turning off power at the breaker, removing the old unit, wiring the new base to the existing wires according to the terminal labels, mounting the thermostat, and completing setup via the manufacturer app. Expect 60-90 minutes for most homes, plus additional time for Wi‑Fi and account setup.
Planning the upgrade: compatibility and preparation
Before you start the replacement, confirm your HVAC system is compatible with your chosen smart thermostat. Most models work with conventional forced air and heat pumps, but some older systems or unconventional wiring may require adapters or professional help. Check that you have a C-wire for continuous power, or be prepared to use a power extender kit if your model supports it. This planning step reduces surprises during wiring and ensures you can fully leverage features like remote scheduling, energy reports, and smart home integration. According to Thermostat Care, the right preparation reduces install time and increases the likelihood of smooth Wi‑Fi setup on the first attempt. Keep a quick diagram of your current wiring for reference during the swap.
Safety first: shut off power and verify eligibility
Power safety is non-negotiable when replacing a thermostat. Start by turning off the circuit breaker that feeds the HVAC system and the thermostat circuit. Use a non-contact voltage tester to confirm there is no live power on the wires you’ll touch. If you see any signs of burning, damaged insulation, or loose conductors, stop and consult a professional. With power off, you can safely remove the existing thermostat cover and inspect the wires. This step minimizes shock risk and prevents accidental damage to the HVAC control board.
Wiring basics you should know before you install
Most smart thermostats share the same wire set: R (24V power), C (common), W (heat), Y (cool), and G (fan). Some homes use jumpers or heat pump wiring like O/B or AUX. If you don’t have a C-wire, many models support a PEK (power extender kit) or can operate on power from the R wire, but you may lose some features. Label each wire according to the terminal it was connected to on the old thermostat. This labeling will help you place wires correctly on the new base. If you encounter unfamiliar wire colors, refer to the unit’s wiring diagram and your HVAC manual. Thermostat Care notes that correct wire mapping is the single most common source of post-install issues.
Choosing a compatible smart thermostat and estimating wiring changes
Choose a model that explicitly lists compatibility with your HVAC type (gas, electric, heat pump, or dual-fuel). Confirm the app supports your smartphone and home ecosystem (iOS/Android, Alexa/Google Home, etc.). Some installations require a C-wire adapter or additional hardware; factor this into your budget and timeline. While most installs are straightforward, a few systems need professional wiring to optimize power delivery or to enable advanced features like humidity sensing and outdoor sensor integration. Planning for extra wiring changes now can prevent a return visit later.
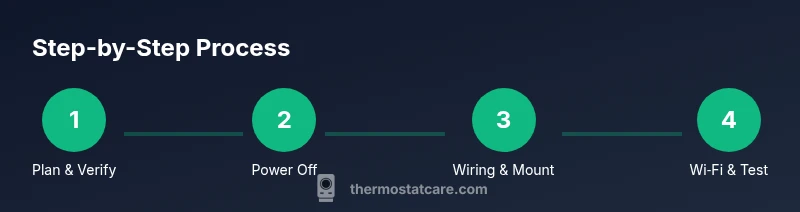
Step-by-step overview: what you’ll do (summary)
In broad terms, you will power down safely, remove the old thermostat, map and label wires, mount the new base, connect wires to the corresponding terminals, attach the thermostat, and complete app-based configuration and testing. This block provides the high-level flow you’ll follow in detail in the STEP-BY-STEP section. Always refer to the specific wiring diagram supplied with your thermostat model for accuracy and safety. Thermostat Care emphasizes confirming C-wire availability and documenting wire colors before you begin.
Wi‑Fi setup and app pairing: stay connected
Once the hardware is in place, install the thermostat’s companion app and connect the device to your home Wi‑Fi. Use a 2.4 GHz network if possible, as some devices do not support 5 GHz. Create or sign in to your account, then follow the prompts to add your thermostat. The app will guide you through selecting your HVAC system type and configuring basic schedules. This step unlocks energy-saving features and remote access, which are the primary benefits of replacing a thermostat with a smart thermostat.
Energy settings and scheduling: maximizing savings
After pairing, customize heating and cooling schedules to match your daily routine. Enable eco or energy-saving modes if available, and set temperature thresholds for occupied vs. unoccupied periods. Some thermostats offer learning algorithms that adapt to your behavior over a few weeks. Review energy reports in the app to identify times when you can tighten your settings without sacrificing comfort. Regularly updating your schedules can yield meaningful efficiency gains over time.
Troubleshooting common issues after install
If the display stays blank, recheck power and battery status (if applicable) and confirm the base plate is firmly mounted. If your HVAC doesn’t respond to changes in the app, verify that the wiring matches your labeling and that the device is enrolled as the correct system type. If you see error codes, consult the thermostat’s manual and Thermostat Care’s troubleshooting guide. For persistent problems, consider a quick consult from a professional to prevent damage to your HVAC control board.
Authority sources and next steps
For deeper guidance, review official manuals from the thermostat manufacturer and credible HVAC education resources. Always cross-check recommendations with your local climate considerations and utility programs. This article synthesizes best practices from Thermostat Care, which prioritizes safety, compatibility, and user-friendly setup for homeowners. Continue exploring the topic to tailor your setup for maximum comfort and savings.
Tools & Materials
- Smart thermostat (model of your choice)(Ensure it supports your HVAC type and has a C-wire option or PEK if needed.)
- Screwdriver set (Phillips #2 and flathead)(Used to remove the old plate and secure the new base.)
- Wire labels or masking tape(Label each conductor to match the old terminal design.)
- Electrical tape(Seal exposed conductors after wiring to prevent shorts.)
- Non-contact voltage tester(Verify power is off before touching wires.)
- Power extender kit (PEK) or C-wire adapter(Recommended if your system lacks a C-wire.)
- Smartphone with the thermostat app installed(Needed for Wi‑Fi setup and scheduling.)
- Wiring diagram from thermostat manual(Follow specific terminals for accuracy.)
Steps
Estimated time: 60-120 minutes
- 1
Power down the HVAC system
Turn off the circuit breaker that supplies the HVAC and thermostat circuit. Confirm no power is present with a voltage tester if available. This prevents electric shock and equipment damage during the swap.
Tip: Always double-check power at both the thermostat circuit and the HVAC unit before touching wires. - 2
Remove the old thermostat cover
Carefully remove the thermostat faceplate and note how the wires connect to each terminal. Take a quick photo for reference. This helps ensure accurate wiring on the new device.
Tip: Label wires immediately after detaching them to avoid mix-ups. - 3
Label and map the wires
Label each wire with its original terminal (R, C, W, Y, G, O/B, etc.). This mapping reduces wiring errors and speeds up the installation.
Tip: If there are extra wires, test them with the thermostat’s guide to determine their function before tucking them away. - 4
Check for a C-wire and prepare power if needed
Inspect whether a C-wire is present. If not, decide whether to use a PEK or rely on a model that supports power stealing, keeping in mind potential limitations.
Tip: If you’re unsure about C-wire adequacy, consult the thermostat’s compatibility chart first. - 5
Mount the new base and attach wires
Secure the smart thermostat base to the wall, then connect each labeled wire to the corresponding terminal on the new unit. Ensure each connection is snug but not over-tightened.
Tip: Use the provided screws and backplate alignment to avoid misalignment that could affect readings. - 6
Attach the thermostat and restore power
Snap the thermostat onto its mounting plate and restore power at the breaker. Confirm the device powers up and displays the home screen.
Tip: If the screen remains dark, recheck the wire connections and the base plate seating. - 7
Install the app and connect to Wi‑Fi
Download and open the thermostat app. Create or sign in to your account, then follow prompts to connect the device to your 2.4 GHz Wi‑Fi network.
Tip: Keep your Wi‑Fi password handy for quick setup. - 8
Configure system type and basic schedules
In the app, select your HVAC type (single-stage, multi-stage, heat pump, etc.). Create basic heating and cooling schedules and enable energy-saving modes if available.
Tip: Start with simple routines and expand as you learn the app’s features. - 9
Test heating and cooling responses
Manually trigger heat and cool commands from the app to verify the system responds correctly and the fan operates as expected.
Tip: If responses are delayed, check network connectivity and any thermostat firmware updates. - 10
Fine-tune settings and enable smart features
Adjust hold settings, vacation mode, and other smart features like occupancy sensing or geofencing if available.
Tip: Experiment with different schedules to find a balance between comfort and savings. - 11
Document settings and confirm compatibility
Keep a record of terminal mappings and any adapters used. Verify the thermostat reports compatible with your HVAC and app ecosystem.
Tip: Save your wiring notes for future reference or servicing. - 12
Review energy reports and optimize
Monitor energy usage over the next few weeks and adjust routines to maximize efficiency without sacrificing comfort.
Tip: Compare pre- and post-install energy usage to measure savings.
Questions & Answers
Is my HVAC system compatible with a smart thermostat?
Most standard HVAC systems are compatible with smart thermostats, but some older or specialized setups may require adapters or professional help. Check the model’s compatibility list and your HVAC’s wiring diagram before purchasing.
Most homes are compatible, but always check the compatibility list first to avoid surprises.
Do I need a C-wire for a smart thermostat?
Many smart thermostats require or prefer a C-wire for reliable power. If your home lacks one, you can use a power extender kit or select a model that supports power-stealing operation, but be aware of potential limitations.
A C-wire is common, but there are options if you don’t have one.
Can I install the thermostat myself or should I hire a pro?
For most standard systems, a confident DIY installation is feasible using the manufacturer’s wiring diagram and app. More complex setups with heat pumps or multi-stage systems may benefit from a professional.
DIY is possible for many, but call a pro for complex systems.
Will replacing my thermostat affect my heating and cooling performance?
A properly installed smart thermostat should preserve performance and may improve it with optimized schedules. Incorrect wiring can disrupt operation, so follow the wiring steps carefully.
If wired correctly, performance is unchanged or improved with smarter scheduling.
How long does the typical installation take?
Most installations take about 60-120 minutes, depending on wiring complexity and whether you need a C-wire adapter.
Typical install runs about one to two hours.
Watch Video
What to Remember
- Verify compatibility before purchase and install.
- Label wires and follow the wiring diagram carefully.
- Use the app to set schedules and review energy reports.
- Keep safety as a priority; power down first and test after wiring.