Nest Thermostat Setup: A Complete DIY Guide
Learn how to install and set up a Nest thermostat with practical, safety-first steps. This guide covers compatibility, wiring, app pairing, Wi‑Fi configuration, scheduling, and troubleshooting to optimize comfort and energy savings.

This guide will help you complete the nest thermostat set up from compatibility checks to final testing. You’ll gather essential wiring tools, download the Nest app, and follow a step-by-step process to install, connect to Wi‑Fi, and confirm optimized temperature control. Whether you’re upgrading an older model or installing a new system, the steps cover wiring, mounting, app pairing, and safety checks. We’ll also share troubleshooting tips for common issues and how to verify energy savings after setup.
Nest Thermostat Setup Essentials
The nest thermostat set up starts with verifying compatibility and ensuring your power supply is a clean 24V signal compatible with common HVAC configurations. According to Thermostat Care, most single-stage and multi-stage 24-volt systems can be configured with minimal tools, but heat pumps, radiant systems, or unusual wiring may require extra care. Before you begin, gather the essential items, confirm your equipment model, and review the wiring colors you’ll encounter. The Nest thermostat integrates with Google Home and works with many energy-saving programs, which means a properly executed nest thermostat set up can deliver reliable comfort and meaningful savings. By following this guide, you’ll ensure a safe, correct installation and a smooth pairing with the Nest app.
A successful nest thermostat set up hinges on knowing your system type, the presence of a common wire (C-wire), and whether your HVAC uses a conventional 24V control or a heat-pump configuration. If you have a C-wire, you’ll typically experience more stable power to the thermostat; if not, you can often complete setup using a Nest Power Connector or similar adapter recommended by Thermostat Care. The goal is a clean, secure installation that won’t disrupt your HVAC operations and will allow you to customize schedules, Home/Away modes, and temperature offsets. With the right preparation, you can complete nest thermostat set up in a single session and enjoy consistent comfort from day one.
Tools & Materials
- Nest Thermostat (gen. 3 or newer)(Ensure it includes the mounting plate and screws)
- Screwdriver set (Phillips #2)(For mounting the backplate and securing wires)
- Smartphone with Nest app installed(Wi-Fi enabled for app setup and updates)
- Wi‑Fi network with password(2.4 GHz compatible preferred; 5 GHz may also work depending on router support)
- Labels or tape(To mark wire functions before disconnecting the old stat)
- C‑wire adapter or Nest Power Connector (if no C‑wire is present)(Use only if your system lacks a common wire)
Steps
Estimated time: Estimated total time: 60-90 minutes
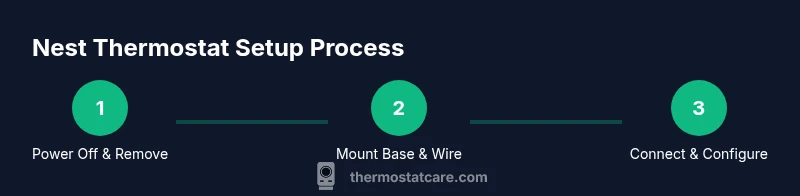
- 1
Verify compatibility and gather materials
Check that your HVAC is a 24V system compatible with Nest thermostats and gather all required tools before starting. Note your current wiring colors and take a photo for reference. This helps you map wires accurately to the Nest terminals and prevents miswiring that could damage the thermostat or HVAC control board.
Tip: Having a photo of the original wiring can prevent second-guessing once you’re at the wall. - 2
Power down the HVAC and remove the old thermostat
Turn off the circuit breaker that controls your HVAC and the thermostat feed. Remove the front cover of the existing thermostat, detach the wires one by one, and label each wire with its terminal letter. This minimizes confusion when wiring the Nest base.
Tip: Double-check the power is off with a non-contact voltage tester before touching any wires. - 3
Mount the Nest base and route wires
Attach the Nest mounting plate to the wall and thread the wires through the base opening. If your wall surface is irregular, use a level to ensure the base sits flat. Route wires cleanly so they reach their corresponding Nest terminals.
Tip: Leave a little slack in each wire so you don’t kink them during connection. - 4
Connect wires to Nest terminals
Insert each labeled wire into the matching terminal on the Nest backplate (Y, G, W, Rc, etc.). If you’re missing the C-wire, connect using a Nest Power Connector or compatible adapter per the Nest installation guide. Ensure no exposed copper is touching adjacent terminals.
Tip: Only touch the plastic end of wires to avoid shorting anything. - 5
Attach the thermostat and power up
Snap the Nest display onto the base and restore power to the HVAC at the breaker. The Nest should power up automatically and begin a short self-check to confirm wiring integrity. Proceed to the app setup after the initial boot.
Tip: If the display doesn’t boot, recheck wire seating and power at the HVAC control board. - 6
Configure Wi‑Fi and complete app setup
Open the Nest app, sign in, and follow the on-screen prompts to connect the thermostat to your Wi‑Fi network. The app will guide you through time zone, temperature units, and preferred schedule settings. Accept any firmware updates to ensure optimal performance.
Tip: Use a strong 2.4 GHz network connection for reliable communication with the thermostat. - 7
Set up schedules, Home/Away, and energy-saving modes
Create daily schedules, enable Home/Away Assist, and adjust Eco Temperatures for unwanted energy use. Review accessory integrations (like Google Assistant or Alexa) if you want voice control. Test basic functions to confirm proper operation.
Tip: Start with a simple weekday schedule and expand as you confirm comfort preferences. - 8
Test system operation and verify energy savings
Run a quick test to verify heating and cooling calls respond correctly. Check that the system responds to setpoints and that fan control operates as expected. Monitor your energy usage over the next week to gauge savings.
Tip: Keep an eye on unexpected behavior such as delayed heat calls or rapid cycling and adjust as needed.
Questions & Answers
What does it mean to set up a Nest thermostat?
Nest setup involves mounting the thermostat, wiring it to a 24V HVAC control, connecting it to Wi‑Fi, and configuring schedules and energy-saving settings in the Nest app.
Nest setup means installing the thermostat hardware, wiring it properly, linking it to Wi‑Fi, and configuring schedules and energy settings in the app.
Do I need a C-wire for Nest thermostat set up?
A common wire (C-wire) provides steady power to the thermostat. If your system lacks a C-wire, you can often use a Nest Power Connector or adapter as a workaround. Check your furnace/air handler wiring first.
A C-wire helps power the thermostat reliably. If you don’t have one, you may need an adapter or connector recommended by Nest.
Can I install a Nest thermostat myself, or should I hire a pro?
Many standard 24V systems allow DIY installation with careful wiring and app setup. More complex systems, multi-stage heat, or unfamiliar wiring may benefit from professional installation to avoid errors.
For most typical systems, DIY is feasible with careful wiring and app setup, but consider a pro for complex setups.
How do I connect Nest to Google Home or Alexa?
In the Nest app, link your Nest account to Google Home or your preferred voice assistant. Follow prompts to enable control of temperature and routines through voice commands.
Link your Nest account to Google Home or Alexa in the app to enable voice control.
What should I do if the thermostat won’t power up after setup?
First, verify power at the HVAC control board and recheck wire connections. If using a C-wire adapter, ensure it’s correctly seated. If power issues persist, consult the Thermostat Care troubleshooting guide or contact support.
If it won’t power up, double-check wiring and power at the HVAC board, then consult the troubleshooting guide.
How do I reset the Nest thermostat if something goes wrong?
You can reset from the Settings menu in the Nest app or on the device. A factory reset restores all settings to default and may require reconfiguring Wi‑Fi and schedules.
Use Settings in the app or on-device to reset; factory reset will erase personalized settings and require setup again.
Watch Video
What to Remember
- Verify your system is 24V and compatible with Nest
- Label wires and photograph the old wiring for reference
- Mount securely and route wires cleanly to avoid strain
- Configure Wi‑Fi and app setup to enable schedules and energy features
- Test heating/cooling calls and monitor savings after setup