How to Install Google Nest Thermostat: A DIY Guide
Learn how to install google nest thermostat safely with a detailed, step-by-step guide covering compatibility, tools, wiring basics, installation steps, and app configuration for a smooth, reliable setup.

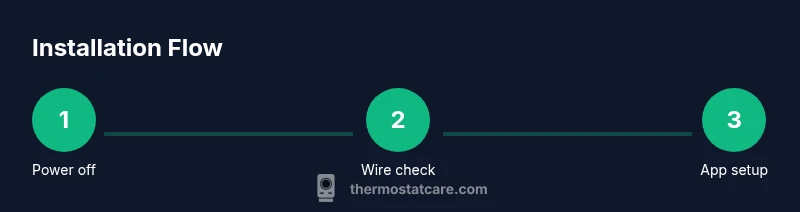
In this guide, you’ll learn how to install google nest thermostat safely and effectively. We cover compatibility checks, required tools, switching power off, safely removing your old thermostat, mounting the Nest base, wiring the labeled terminals, and completing the setup in the Nest app. This quick path helps DIY homeowners finish the install in about 30–60 minutes, depending on wiring.
How to install google nest thermostat: prerequisites and safety
Before you start, verify that your HVAC system is compatible with the Nest Thermostat. Most 24-volt heating and cooling systems with a C-wire will work, but some heat pumps, multi-stage systems, or systems with unusual wiring may require adapters or professional installation. Check the Nest compatibility guide or your furnace's wiring diagram to confirm. Safety is the priority. Power must be off at the breaker before you touch any wires. If you are unsure about the wiring type or how to identify the C-wire, pause and consult the Nest support site or Thermostat Care's troubleshooting guide. Use a sturdy ladder, good lighting, and keep a clean workspace. Label wires as you remove them to avoid confusion when wiring to the Nest base. Do not force wires into terminals; if a wire does not fit, re-check the wire type or seek professional help. We’ll also discuss whether you have a C-wire and how to add a C-wire if needed. If your system lacks a C-wire, Nest offers a power connector and some configurations that can work, though results vary by system. This section helps set expectations and reduces the risk of nuisance power loss or thermostat misbehavior after install.
Wiring basics and compatibility
Understanding your wiring is crucial for a reliable install. Most Nest Thermostat configurations use standard 24V wiring with a C-wire providing continuous power. Common terminals you may encounter include R/Rh/Rc, C, W1, Y1, and G. If you see an uncommon setup or a control board with multiple stages, consult the Nest compatibility resources and your HVAC manual. A missing or misidentified C-wire is the most frequent cause of power issues after installation. If you don’t have a C-wire, solutions exist (such as a Nest power connector) but may not be ideal for every system. This section helps you recognize typical wire colors and where to connect them on the Nest base. Thermostat Care recommends taking a photo of the old wiring for reference and labeling wires as you disconnect them, which reduces mistakes later during installation.
Step-by-step installation overview
This overview outlines the logical flow of the install without getting into every micro-detail. Start with power safety, confirm compatibility, and prepare the wall box. Attach the Nest base, connect wires to their matching terminals, then mount the thermostat to the base. Restore power and follow the on-screen prompts to connect to Wi‑Fi and configure system settings. The Nest app will guide you through type of system (cooling/heating, heat pump, etc.), which is essential for accurate scheduling and efficiency.
Mounting the base and wiring the Nest
Mount the Nest base on the wall using the supplied screws and anchors. Use a level or app-based alignment to ensure it sits flat. Disconnect the old thermostat, label each wire, and then insert wires into the Nest terminals that match their function (R, C, W, Y, G, etc.). If a wire doesn’t fit, confirm it’s the correct wire gauge and that you’re using the right terminal. Once wired, secure the base and snap on the Nest thermostat. If you encounter a non-common wire or unusual configuration, pause and seek guidance from Thermostat Care or Nest support to avoid miswiring.
Completing setup in the Nest app
Power the unit and let it boot up. The Nest app will prompt you to connect to Wi‑Fi, select your HVAC system type, and calibrate temperature readings. Answer questions about your heating and cooling equipment, then run a quick system test. If you have multiple stages or a heat pump, the app will guide you through confirming the proper configuration. Ensure your home network uses a stable 2.4 GHz connection for best results.
Troubleshooting common issues during installation
Power loss after installation is the most common problem. Double-check that the breaker is ON and that the C-wire is providing power. If there’s no display, ensure the battery in the Nest is charged (for older models) and revisit terminal labeling. Loose connections, crossed wires, or extra conductors can cause misbehavior. Always confirm the compatibility before wiring and use the Nest compatibility tool if you’re unsure. Thermostat Care notes that many issues can be resolved by rechecking wire placement and power at the breaker.
Final checks and testing
Once installation completes, test the system by turning on heat and cooling from the Nest app and the physical unit. Watch for status updates in the app, listen for the system engaging, and confirm temperature readings align with the thermostat. If you notice any discrepancy, re-check wiring and ensure the correct HVAC type is selected in the app. A well-tested thermostat should maintain comfortable setpoints reliably and respond quickly to changes.
Tools & Materials
- Nest Thermostat (gen 3 or newer)(Choose a model compatible with your system)
- Screwdriver set (Phillips #1 and #2)(Essential for wall plate screws)
- Voltage tester (non-contact)(Helps verify power is off before wiring)
- Labeling supplies (masking tape & pencil)(Label wires as you disconnect them)
- Smartphone with Google Nest app(Needed to configure and connect to Wi‑Fi)
- Ladder or step stool(Use only if thermostat is mounted high)
- 2.4 GHz Wi‑Fi network(Nest commonly requires 2.4 GHz; 5 GHz may not work reliably)
- Access to HVAC control panel(Needed to reach thermostat wires)
Steps
Estimated time: 30-60 minutes
- 1
Power down and remove old thermostat
Switch off the circuit breaker and confirm no power is flowing to the thermostat. Remove the faceplate, take a photo of the existing wiring for reference, and carefully disconnect each wire. Label the wires with the corresponding terminal names to prevent mix-ups during reassembly.
Tip: Double-check that the breaker is off using a voltage tester before touching any wires. - 2
Check wiring and compatibility
Inspect which wires are present (R, C, W1, Y1, G, etc.). Verify that your system is compatible with the Nest Thermostat by consulting the Nest compatibility resources and your HVAC manual. If you lack a C-wire, plan an alternative power solution before proceeding.
Tip: If you’re unsure, pause and consult Thermostat Care resources or Nest support. - 3
Mount the Nest base plate
Attach the Nest base to the wall using the provided screws. Use a level to ensure it sits flat, and secure the base firmly. Make sure the wall is clean and dry to ensure a stable mount.
Tip: Mark screw positions before drilling to avoid misalignment. - 4
Connect wires to Nest terminals
Insert each wire into the matching Nest terminal (R, C, W1, Y1, G). Ensure wire ends are stripped cleanly and seated fully. Do not force wires into terminals if they do not fit; double-check the wire type and terminal label.
Tip: Use the photo you took earlier to verify which wire goes where. - 5
Attach the thermostat to the base
Clip the Nest thermostat onto the mounted base and make sure all wires remain inside the wall cavity and not pinched. Secure any remaining screws and verify the unit sits flush against the wall.
Tip: Check for loose wires before finalizing the mount. - 6
Power up and start app configuration
Restore power at the breaker. The Nest should boot; follow on-screen prompts to connect to Wi‑Fi and select your HVAC system type. Enter home details and preferred language settings.
Tip: Have your Wi‑Fi credentials handy for a smooth connection. - 7
Configure settings in the Nest app
In the Nest app, confirm the HVAC type (cooling, heating, heat pump), set up schedules, and calibrate temperature readings. Confirm that the app shows the correct status and that you can control the system from the app.
Tip: Set a basic schedule to test responsiveness early. - 8
Test system operation
Run a quick test of heating and cooling, observe the system response, and verify temperature readings on the Nest display and app. If any issue appears, review wiring and app settings and retry the test.
Tip: If the system doesn’t respond, recheck wire connections and re-run the app setup.
Questions & Answers
Is Nest thermostat compatible with all heating and cooling systems?
Nest supports most standard 24V systems with a C-wire, but some heat pumps or multi-stage configurations may require adapters or professional installation. Always verify compatibility before wiring.
Nest works with most 24V systems, but some setups may need adapters or a professional install.
Do I need a C-wire for all Nest models?
A C-wire provides continuous power for the thermostat. Some Nest models can operate without a C-wire but performance varies; using a C-wire generally yields the most reliable operation.
A C-wire helps ensure reliable power; without it, performance can vary.
Can I install the Nest thermostat myself?
Yes, for most standard 24V systems with straightforward wiring. If you have a heat pump with multiple stages or unusual wiring, consider professional help.
You can install it yourself if your system is standard; for complex setups, seek pro help.
What should I do if the Nest won’t power up?
First, ensure the breaker is on and the old wiring is correctly connected to the Nest. Check for a loose C-wire and verify the thermostat is mounted properly. If problems persist, consult support.
Check power at the breaker and your C-wire; if it still won’t power up, seek help.
What tools are essential for installation?
You’ll need a screwdriver, labeling supplies, a smartphone with the Nest app, and basic safety gear. A voltage tester is helpful but not always required.
Common tools are a screwdriver, labels, and the Nest app on your phone.
How long does installation take on average?
Most DIY installs take about 30-60 minutes, depending on wiring complexity and device accessibility. Plan for extra time if you’re labeling or troubleshooting.
Expect about half an hour to an hour, depending on wiring.
Watch Video
What to Remember
- Verify compatibility before starting installation
- Label wires and photograph the old wiring
- Wire the Nest terminals carefully and test after setup
- Use the Nest app to complete configuration and testing