Home Thermostat Replacement: A Complete DIY Guide
Learn how to safely perform home thermostat replacement with a clear, step-by-step guide, wiring basics, safety reminders, and post-install calibration for comfort and energy savings.

With home thermostat replacement, you can upgrade to a smarter, more efficient system. This guide shows when to replace, how to choose a compatible model, and the exact steps to swap thermostats safely. You'll learn wiring basics, safety checks, and post-install setup to ensure reliable comfort and energy savings. even if you have limited DIY experience.
Why replace a thermostat now\n\nFor many homes, replacing an older thermostat with a modern unit delivers more accurate temperature control and greater energy efficiency. The decision to replace is usually driven by aging hardware, poor battery performance on non-smart models, compatibility issues with new HVAC equipment, or a desire to access smart features such as remote scheduling, adaptive recovery, and learning algorithms. According to Thermostat Care, evaluating these factors in the context of your home’s comfort needs is the best first step. The goal is to improve reliability, reduce energy waste, and simplify operation. Modern thermostats support both traditional heating and cooling systems and energy-saving modes that trim energy use without sacrificing comfort. You will also notice a smoother interface and faster response times, which reduces the frustration that often accompanies manual adjustments. In this part of the guide we’ll compare common scenarios and help you decide whether replacement is the right move for your home.
Compatibility and selecting a replacement\n\nChoosing the right thermostat starts with compatibility. Verify that the new unit supports your HVAC configuration—gas, electric, oil, or heat pump—and that it provides the wiring options your system requires, such as a C-wire for constant power. If you have a multi-stage system or a heat pump, look for a thermostat designed for that setup. Look for clear labeling of terminals and ensure the new device’s backplate aligns with standard wall box dimensions. Thermostat Care analysis shows that most successful replacements happen when homeowners double-check system type, confirm battery vs. hardwired power needs, and review installation manuals before purchase. Beyond wiring, consider features like Wi‑Fi connectivity, adaptive scheduling, remote control, and compatibility with your preferred smart home ecosystem. Taking a few minutes to compare models will save time and reduce the risk of returns or compatibility problems later.
Safety and planning your swap\n\nElectrical work carries risk, so plan carefully. Always power down the circuit at the main breaker and, when possible, switch off the HVAC unit’s power as well. Use a non-contact voltage tester to verify that no voltage is present on the thermostat wires before you touch anything. Follow all manufacturer warnings and local electrical codes. If your home has outdated wiring, a GFCI-protected circuit, or unusual terminal configurations, consider consulting a licensed electrician. Thermostat replacements are straightforward for many standard setups, but safety must come first. Keep the work area clean and dry, and protect furniture from dust and debris during the process.
Tools and materials you’ll need (before you start)\n\nBefore you reach for the drill, gather the essential tools and parts. The following list helps ensure you won’t pause mid-project. A new thermostat compatible with your HVAC system; a screwdriver set (Phillips and flat-head); a non-contact voltage tester to confirm power is off; wire labels or masking tape to identify each conductor; and electrical tape for securing connections. If your unit supports battery power, you may skip some wiring steps, but always verify power requirements first. A multimeter is optional but can help confirm voltages in ambiguous cases. Having a simple mnemonic for the wiring (like labeling each wire with its terminal letter) reduces confusion and speeds up the process.
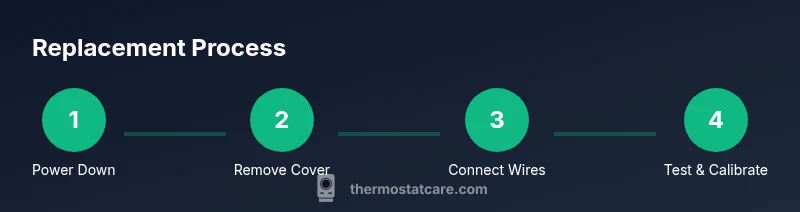
High-level overview of the installation process\n\nThis section provides a non-technical overview of what’s involved in a home thermostat replacement. You’ll start by ensuring power is off, then remove the old thermostat and record how its wires connect to the base. Next, you’ll mount the new base plate, route wires through the wall box, and connect each to the appropriate terminal on the new thermostat. Finally, you’ll reassemble the faceplate, restore power, and complete the setup on the device. The exact wiring map varies by model and system, so consult the manual for terminal letters and jumper requirements. Accuracy at this stage prevents misconfigurations that could lead to poor temperature control or system faults.
Aftercare, calibration, and optimizing energy use\n\nOnce the new thermostat is installed, take a few minutes to configure your preferred temperature schedule, confirm the time and date are correct, and calibrate if your model supports it. Many modern thermostats offer energy-saving modes, smart scheduling, and geofencing that helps reduce unnecessary cooling or heating when you’re away. Observe the system’s behavior over the first 48 hours and adjust schedules to balance comfort with efficiency. If you have a heat pump, check seasonal settings to ensure reversing valve operation aligns with your climate. Regular checks—at least once per year—help keep the device accurate and prolong its lifespan. Thermostat Care emphasizes incorporating these steps into your routine for steady comfort and consistent energy savings.
Troubleshooting post-installation issues\n\nIf the display is blank, the system won’t respond, or you see error codes, start with basic checks: verify power is on, re-check wiring, and ensure the thermostat is compatible with your HVAC. A blank screen can indicate a lost power supply or a blown fuse. Miswiring can cause the HVAC to fail to respond, so compare the wiring map to the unit’s instructions. If problems persist after a careful check, contact a professional. While most replacements go smoothly, complex systems or unusual wiring configurations may require expert intervention. The Thermostat Care team recommends seeking assistance when in doubt to avoid damage to your HVAC or electrical components.
Tools & Materials
- New thermostat compatible with your HVAC system(Check compatibility with heat pump, cooling type, and C-wire requirements)
- Screwdriver set (Phillips #2 and flat-head)(For mounting plate and terminal screws)
- Non-contact voltage tester(Verify power is off to the thermostat wiring)
- Wire labels or masking tape(Label each wire with its terminal letter)
- Multimeter (optional)(Useful for verifying voltage if you're unsure)
Steps
Estimated time: 60-90 minutes
- 1
Power down and verify wiring
Turn off the circuit feeding the thermostat at the main breaker. Use a non-contact tester to confirm there is no voltage on the wires before touching them.
Tip: Double-check the breaker labeling to ensure the correct circuit is cut. - 2
Remove the cover and photo the wiring
Carefully remove the thermostat cover and mounting plate. Take clear photos from multiple angles to document wire positions.
Tip: Photos help reverse-engineer the wiring if you mislabel anything. - 3
Label wires and disconnect from old unit
Label each wire with its terminal label and gently disconnect. Do not pull on wires; loosen screws to release them.
Tip: Keep wires organized to prevent confusion later. - 4
Mount the new base plate
Attach the new thermostat's mounting plate to the wall straight using a level. Mark screw holes and drive screws securely.
Tip: Use a level to ensure the thermostat sits flat. - 5
Connect wires to new thermostat
Connect each wire to the corresponding terminal on the new unit based on the labels. If you have a C-wire, connect it to C as required.
Tip: If a jumper was present on the old unit, transfer it if necessary according to the manual. - 6
Attach, power up, and calibrate
Attach the thermostat to the base, restore power, and boot the device. Follow on-screen prompts to configure system type and preferences.
Tip: Run a quick test for heat and cool to verify operation. - 7
Test and finalize installation
Set basic schedules and test temperature control, fan modes, and any smart features. Confirm thermostat communicates with HVAC.
Tip: Keep the original manual handy for model-specific steps.
Questions & Answers
Do I need to hire a professional to replace a thermostat?
Many homeowners can replace a thermostat themselves if they have basic electrical skills and follow the manual. Complex systems with heat pumps or multi-stage configurations may benefit from professional installation.
You can DIY if you have basic electrical skills; complex systems may need a pro.
Is replacing a thermostat safe for beginners?
Yes, when you follow safety steps: cut power, verify no voltage, and use proper tools. If you're unsure, pause and seek guidance.
It can be safe if you carefully follow safety steps and use the right tools.
What if my thermostat is battery powered?
Battery-powered models don’t require a C-wire for power, but may have features that rely on a battery. Check the manual for power needs.
Battery-powered units don’t need a C-wire, but check the manual.
Will replacing the thermostat affect warranty?
Some manufacturers require professional installation for warranty coverage. Check your warranty terms before replacing.
Check the warranty terms; some may require a pro.
How do I know which thermostat I should buy?
Choose a thermostat compatible with your HVAC type (gas, electric, heat pump) and that offers your desired features (smart, Wi-Fi, multi-stage).
Pick a model compatible with your system and features you want.
Can I install a thermostat with a heat pump myself?
Yes if the thermostat explicitly supports heat pumps and multi-stage operation. Follow the installation manual carefully.
Yes, if supported by the thermostat and you follow the manual.
What are common mistakes to avoid?
Incorrect wiring, skipping power-off, ignoring compatibility, and mislabeling wires are common errors. Double-check everything.
Watch wiring carefully and never skip the safety steps.
What to Remember
- Plan before you start and verify compatibility.
- Label wires to ensure correct reconnection.
- Power off and test before handling any wiring.
- Test HVAC function after installation and calibrate.
- Consult a professional if the system is complex.