Nest Thermostat E Wiring Diagram: A Practical Guide
A comprehensive, safety-focused guide to understanding and implementing a Nest Thermostat E wiring diagram, including C-wire options, common configurations, step-by-step installation, and troubleshooting.

According to Thermostat Care, wiring the Nest Thermostat E correctly is essential for reliable performance and accurate temperature control. This guide helps you understand the nest thermostat e wire diagram, verify your wiring, and safely install or upgrade to a C-wire or compatible power source. By following the steps, you'll reduce resets and improve thermostat responsiveness. Whether you’re swapping an old thermostat or wiring a new Nest E, this article covers common configurations, safety tips, and troubleshooting for a clean, professional result.
Nest Thermostat E Wiring Essentials
The Nest Thermostat E is designed to work with a range of conventional and heat-pump HVAC systems. A clear understanding of the nest thermostat e wire diagram helps homeowners identify which terminals are active in their setup and how to wire the device for reliable power and control. In most standard single-stage systems, you will interact with R (power), C (common), W1 (heat), Y1 (cool), and G (fan). In heat-pump configurations, O/B (reversing valve) becomes relevant. The nest thermostat e wire diagram will vary slightly depending on your equipment, but the general principle remains the same: you connect the live power from the transformer to R and return power via C, then interrupt signals to heat, cool, and fan through the appropriate terminals. For homeowners, knowing this wiring diagram reduces calls to support and helps you diagnose issues quickly. As highlighted by Thermostat Care analysis, getting the power path correct is the single most important factor for stable operation.
Wire Types, Colors, and Safety
Wires come in colors that commonly indicate their function, but color alone isn’t a guarantee. Always verify each wire’s role at the HVAC control board before reuse. Typical functions on a Nest E installation include: R (24V hot), C (common/return path), G (fan), Y1 (compressor), W1 (auxiliary heat), and O/B (heat-pump reversing valve). The nest thermostat e wire diagram helps map these wires to the corresponding Nest terminals. Safety first: turn off power at the furnace and the thermostat circuit breaker before touching any wires, and test for absence of voltage with a non-contact tester.
Reading a Nest Thermostat E Wiring Diagram: A Practical Approach
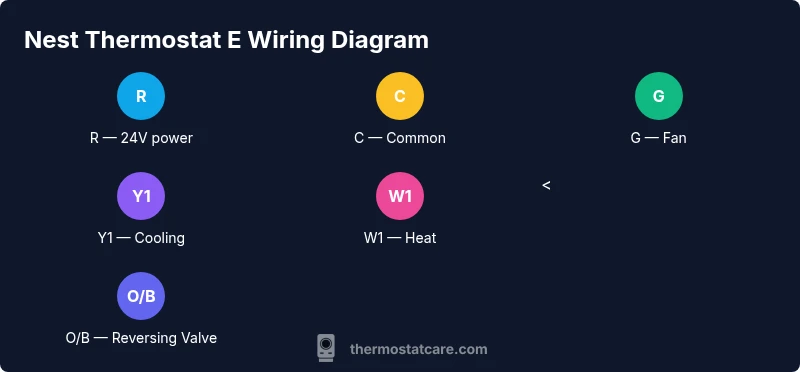
A wiring diagram for the Nest Thermostat E shows where each control wire should land on the thermostat base. The Nest base typically provides labeled terminals for R, C, G, Y1, W1, and O/B. To read the diagram effectively, confirm the transformer’s power path, identify the common line, and then trace each signal branch to the loads (heating or cooling). If the system uses a humidifier or dehumidifier, additional wires may appear, and you’ll need to connect them to their corresponding Nest terminals or use an external relay if required. Consistency between the control board and the thermostat terminal map is essential for a clean install. Thermostat Care’s conclusion highlights that even small misplacements can cause cycling problems or power drops, so double-check each connection.
Common Configurations: Single Stage Heat/Cool, Heat Pump, and Accessories
Most Nest E installs fall into one of a few common configurations. A typical single-stage heat/cool system uses R, C, W1, Y1, and G. A heat-pump setup adds O/B for the reversing valve and may require additional settings in the Nest app to accommodate cooling and heating modes. If you have accessories such as humidifiers, dehumidifiers, or ventilators, you might encounter extra wires that should be isolated and not connected to the Nest unless the Nest model explicitly supports them. Always refer to the nest thermostat e wire diagram for the exact terminal mapping, and calibrate the Nest according to your equipment type to avoid misfires or comfort issues.
Power Options: C-Wire vs Power Connector vs G Wire
Power delivery is a critical aspect of Nest E performance. The ideal setup includes a C-wire to provide a constant return path for the thermostat’s electronics, which helps prevent dim displays and reboots. If a C-wire isn’t present, you can use a Nest Power Connector or rely on power-stealing methods in certain configurations, though these options can introduce occasional charging glitches in some systems. The nest thermostat e wire diagram will indicate whether the C-wire is required or optional for your specific HVAC configuration. Thermostat Care notes that adding a dedicated C-wire generally yields the most reliable operation, especially in systems with older transformers or longer cable runs.
Step-by-Step Wiring Considerations Before You Begin
Before you start wiring, inventory all wires at the current thermostat, confirm their function, and document colors. Check if the control board has all required terminals and whether you’ll use a C-wire. It’s helpful to label wires with small tags for easy reattachment. If you encounter an unfamiliar wire (for example, a spare conductor or a second stage wire), verify its function with the HVAC equipment manual or a multimeter. Keeping a clean, labeled map of wires will make the Nest E installation straightforward and reduces the risk of miswiring.
What to Do If There's No C-Wire in Your Wall
If there is no C-wire present, you have a few viable options. The most straightforward is to install a C-wire by pulling a new conductor from the HVAC control board to the thermostat location. If running new wiring isn’t feasible, consider using the Nest Power Connector, which provides a stable power path without needing a direct C-wire. Some installations can also work with a G-wire or Y1-wire as a power source, but this can cause limitations or thermostat resets under certain loads. Always follow the nest thermostat e wire diagram and the thermostat’s installation guide when selecting a solution.
Testing and Verifying Wiring After Install
Once wired, power the system back up and run through the Nest setup wizard. Verify that the thermostat recognizes the system type (heat, cool, or heat-pump) and that the Pro Wire test confirms the wires land on the proper terminals. Test each function, including heating, cooling, and fan operation, and observe the Nest’s response. If the Nest fails to power on or if a fault code appears, re-check wire assignments against the nest thermostat e wire diagram and ensure the common path is complete. In many cases, reseating wires and rechecking the labels resolves most issues.
Safety and Compliance: DIY vs Professional Help
Wiring a thermostat is generally safe when you follow standard electrical safety practices, but it is not without risk. If you have a boiler control, dual-transformer system, or high-voltage components, consult a licensed HVAC technician. In complex configurations, professional installation minimizes risk and ensures the Nest E is calibrated for your system. Thermostat Care emphasizes that homeowners should only proceed if they are confident and comfortable with basic wiring tasks and safety checks. If you’re unsure, seek professional help.
Troubleshooting Common Wiring Issues
Common issues include a missing power signal, incorrect wire labeling, or a loose connection at the control board. Always start by powering down and confirming there’s no voltage before touching wires. If the Nest display flickers or resets, verify that R and C are properly connected and that the wires aren’t shorting against the backplate. When the fan or compressor doesn’t respond to Nest commands, re-check G and Y1 wiring and confirm the HVAC equipment supports those signals. Finally, re-run the Nest setup to confirm the system type aligns with your actual configuration.
Tools & Materials
- Flathead screwdriver(For removing the thermostat cover and panel screws)
- Phillips screwdriver(For wall plates and mounting screws)
- Non-contact voltage tester(To confirm no voltage on wires before handling)
- Wire labels/tags(Label each wire as you disconnect it)
- Wire strippers/cliers(Trim and clean wire ends for secure connections)
- Multimeter(Optional for confirming voltages and continuity)
- Extra thermostat wires(If you need to run a C-wire or extend existing cables)
- Nest Thermostat E mounting kit(Includes base and screws)
Steps
Estimated time: 45-75 minutes
- 1
Power down and verify no voltage
Turn off the furnace circuit breaker and the thermostat’s power supply. Use a non-contact tester to ensure there’s no live voltage on any wires before handling them.
Tip: Always double-check at the HVAC control board, not just the thermostat casing. - 2
Remove old thermostat and expose wiring
Carefully loosen the mounting screws and pull the old thermostat from the wall. Gently expose the wire ends and capture how they connect to the existing terminals.
Tip: Take a quick photo of the old wiring as a reference. - 3
Label wires and map to Nest terminals
Label each wire and match it to Nest base terminals (R, C, W1, Y1, G, O/B). Use the nest thermostat e wire diagram to verify correct placement.
Tip: Use consistent labeling, especially if multiple wires look similar. - 4
Check for C-wire availability or decide on power option
If a dedicated C-wire exists, plan to connect it to C on the Nest base. If not, decide whether to install a Nest Power Connector or use a power-stealing option compatible with your system.
Tip: If unsure, default to adding a C-wire; it provides the most reliable power. - 5
Prepare Nest base and wire ends
Trim and strip wires to expose clean copper, then straighten and align them for easy insertion into the Nest terminal slots.
Tip: Avoid nicking insulation on the conductors. - 6
Connect wires to Nest base
Insert each labeled wire into its corresponding Nest terminal (R, C, W1, Y1, G, O/B). Ensure a snug, secure fit to prevent arcing.
Tip: Press wires in firmly and avoid forcing a wire into an incorrect terminal. - 7
Mount the Nest E and restore power
Attach the Nest base to the wall plate, secure mounting screws, and restore power at the furnace and breaker panel. Start the Nest setup wizard.
Tip: Keep a backup photo handy in case you need to revisit wiring choices. - 8
Run diagnostics and test system
Test heating, cooling, fan operation, and, if applicable, heat-pump reversing valve by simulating commands via the Nest app. Confirm that all functions respond correctly.
Tip: If you see an error, re-check the wiring against the nest thermostat e wire diagram and repeat testing.
Questions & Answers
Do I need a C-wire for Nest Thermostat E?
Most setups benefit from a C-wire for stable power, but the Nest E can operate without one using power-stealing methods or a Power Connector. Adding a C-wire generally reduces power-related resets.
A C-wire is typically recommended for reliability; if you can run one, it’s worth it.
What wires does the Nest Thermostat E use?
Common wires include R, C, G, Y1, W1, and O/B for heat-pump setups. Always verify with your HVAC panel and the nest thermostat e wire diagram.
R, C, G, Y1, W1, and O/B for heat pumps are typical.
Is it safe to install Nest Thermostat E myself?
DIY installation is possible if you follow safety steps and use the correct wiring practices. Seek a pro if you’re dealing with dual-transformer systems or uncertain wiring.
DIY is OK if you’re careful; for complex systems, hire a pro.
What if there is no C-wire in my wall?
Use a Nest Power Connector or run a new C-wire from the furnace to the thermostat location. Do not bypass safety protocols.
If there’s no C-wire, use the Power Connector or run a new C-wire.
How do I test the wiring after installation?
Power on the system, verify that heating, cooling, and fan respond through the Nest interface. Use the Nest app to run test programs if available.
Turn on the system and run the Nest tests to confirm operation.
I have a heat pump with O/B valve; how should I wire?
Connect O/B to the O/B terminal, ensure Y1 for cooling, and adjust reversing valve settings in the Nest app. Review heat-pump specifics in the installer guide.
O/B goes to O/B; Y1 is for cooling.
Watch Video
What to Remember
- Label wires before removal
- C-wire improves Nest E reliability
- Power off before starting
- Test system after wiring