What Is Needed for a Smart Thermostat: A Practical Guide
Discover what is needed for a smart thermostat, from power and wiring to Wi‑Fi and installation steps. Thermostat Care explains compatibility, safety, and budgeting to make DIY upgrades smooth and reliable.

A smart thermostat typically requires a 24‑volt HVAC system with a working C‑wire (or a compatible power source), stable Wi‑Fi, and a mounting location with accessible control wiring. Ensure your HVAC is compatible, your network is reliable, and you can physically install the device in a safe spot. This combination unlocks remote control, scheduling, and smarter energy use.
What is needed for a smart thermostat: core prerequisites
A smart thermostat is more than a wall device; it integrates with your home's HVAC and Wi‑Fi network. According to Thermostat Care, the essential prerequisites are a compatible HVAC system, a reliable power source for the thermostat (ideally a working C‑wire), and a stable internet connection. Start by identifying your HVAC type (furnace, boiler, heat pump, or multi‑stage systems) and check that the existing wiring supports the standard terminals: R, C, Y, G, and W. The thermostat you choose should explicitly state compatibility with your HVAC configuration, power requirements, and control protocol. A secure mounting location with clean accessibility and a strong router signal in the installation area are also crucial. If these elements are in place, you gain full remote control, scheduling, and ecosystem integration.
Power and wiring: ensuring continuous power without false starts
Power reliability is essential for a dependable smart thermostat. Most models draw a small amount of current from the C‑wire; if the C‑wire is missing or damaged, you may rely on a battery or a power extender kit (PEK) offered by some brands. If there is no C‑wire, evaluate options: run a new C‑wire from the HVAC control board, install a PEK, or select a model designed for power stealing with caveats. Familiarize yourself with common wire colors and terminals: R/Rh/Rc, C, Y, G, and W. Always power down the circuit before inspecting or adjusting wires. After confirming power, test with a multimeter to verify 24V between R and C and check continuity where needed. A solid power foundation reduces reboot loops and keeps scheduling and sensors accurate.
Wi‑Fi and network requirements: keeping the thermostat connected
A reliable internet connection is the backbone of a smart thermostat's value. Ensure your network supports the thermostat's connectivity needs—most devices work with 2.4 GHz networks and many also support 5 GHz. Assess signal strength at the thermostat mounting site; if the signal is weak, consider a mesh system or Wi‑Fi extender. Secure your network with a strong password and enable update automation so firmware remains protected. For homes with strict networks (such as guest portals or captive networks), plan to complete the setup on a trusted home network and temporarily disable captive access during initial configuration. Finally, verify that outbound access to cloud services (HTTPS port 443) is not blocked by your router's firewall, ensuring seamless remote access and software updates.
Electrical compatibility across HVAC types: heat pumps, multi‑stage, and more
Smart thermostats support a broad range of HVAC configurations, but some advanced features require specific wiring or system types. Conventional gas or electric furnaces with simple single‑stage cooling typically pair with most models. Heat pumps, multi‑stage compressors, and systems with auxiliary heat may require compatible terminals, jumper configurations, or additional accessories. Check the thermostat's compatibility list for your exact equipment, and note how features like fan control, emergency heat, and stage management align with your system. If you are unsure, start with a model that explicitly lists support for your HVAC type and avoids optional add‑ons that might complicate installation.
Choosing a model: features to match your needs
Selecting the right model means prioritizing core needs over bells and whistles. Decide whether you want advanced energy reports, geofencing, occupancy sensing, or voice assistant control. Focus on models that clearly indicate compatibility with your HVAC type, include a reliable power solution (C‑wire or PEK), and support the networking standards you use. Consider display readability, scheduling flexibility, and the ease of installation. Thermostat Care recommends choosing a model that provides robust diagnostics, update history, and straightforward remote access to avoid feature gaps or reliability issues after installation.
Installation steps: a practical, DIY‑friendly plan
Prepare a quiet, well‑lit workspace and gather tools such as a screwdriver, a non-contact voltage tester, and a multimeter. Turn off power at the circuit breaker to your furnace/air handler, then remove the old thermostat carefully, labeling wires as you disconnect. Match each wire to the corresponding terminal on the new thermostat (R, C, Y, G, W, etc.). If you lack a C‑wire, decide now whether to run a new wire, install a PEK, or choose a model that supports power stealing with caveats. Attach the mounting plate, tuck wires neatly, and mount the device. Restore power and run through the on‑screen setup, connecting to Wi‑Fi and registering the thermostat to your account. Finally, program a basic schedule and verify each mode (cooling, heating) functions correctly.
Budgeting: costs to expect and where to invest
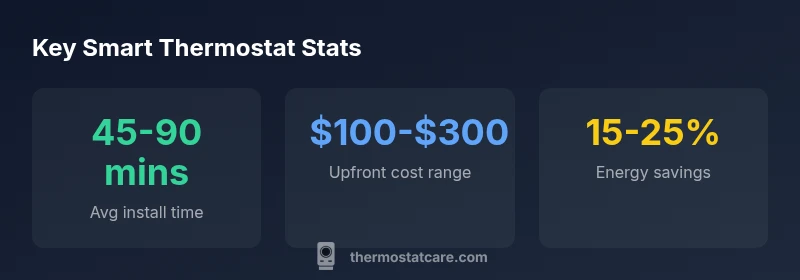
A smart thermostat upgrade involves upfront parts costs and potential professional installation if you prefer not to DIY. Typical ranges for equipment are modest, but your final price depends on the model, required accessories (like a PEK), and whether you need new wiring or a professional run. Budget for the thermostat itself, possible wire upgrades, mounting hardware, and, if desired, a quick setup service. Planning for a 2026 price range helps, but always verify current estimates with retailers and quoted installers in your area. Thermostat Care emphasizes balancing cost with reliability and feature needs to maximize long‑term energy savings and comfort.
Troubleshooting and quality checks: post‑install health checks
After installation, verify that the thermostat reports system status accurately, responds to commands, and syncs reliably with your mobile app. Look out for common issues like Wi‑Fi drops, inaccurate temperature readings, or slow response to settings changes. Run a quick test by allowing the system to cycle through heating and cooling, observing temperature differentials and fan behavior. If a problem arises, recheck wiring connections, confirm power stability, and consult the setup guide for your device. Thermostat Care notes that most reliability concerns stem from wiring or network issues rather than the thermostat hardware itself.
Final checks: ready to rely on smarter comfort
With prerequisites confirmed, power and network solid, and a compatible HVAC system, your smart thermostat is ready to deliver smarter comfort and measurable energy savings. Revisit your initial goals—time‑based schedules, adaptive learning, or remote monitoring—and fine‑tune settings to your routine. Periodically review firmware updates and security settings, and keep a simple spare wire or PEK handy for future upgrades. By pairing sound electrical wiring, secure networking, and an installation that respects your HVAC configuration, you maximize performance and minimize post‑install headaches.
Key setup requirements for most residential smart thermostats
| Aspect | Requirement | Notes |
|---|---|---|
| Power supply | 24V control, common and hot (R/C) | C-wire recommended; use PEK if no C-wire available |
| Wiring | C-wire presence, terminal labels R, C, Y, G, W | Verify wiring matches thermostat terminals |
| Connectivity | Stable Wi‑Fi, 2.4 GHz preferred | Consider mesh extender for weak signals |
| HVAC compatibility | Works with your system type | Check model’s compatibility list |
Questions & Answers
What is the first step to install a smart thermostat?
Begin with a compatibility check: confirm your HVAC is 24V, verify the presence of a C‑wire, and ensure reliable Wi‑Fi coverage where the thermostat will be mounted.
First, check compatibility, then prepare power and Wi‑Fi. This keeps installation smooth.
Do I always need a C‑wire for a smart thermostat?
Many models require a C‑wire for consistent power, but some support power stealing or PEKs as alternatives when a C‑wire is unavailable.
Most need a C-wire, but some options work without one using power stealing or a PEK.
Can I install a smart thermostat on a heat pump?
Yes, most smart thermostats support heat pumps, but confirm compatibility for multi‑stage or auxiliary heat to ensure full feature support.
Yes, but check multi‑stage support for heat pumps.
Is professional installation necessary?
Not always. If you’re comfortable with wiring and basic electrical safety, you can install and configure the device yourself. A professional is recommended for complex systems or to guarantee warranty coverage.
For simple setups, DIY is fine; for complex systems, consider a pro.
Will a smart thermostat save energy in practice?
Smart thermostats can contribute to energy savings through scheduling and adaptive learning, but actual results depend on usage patterns and climate.
Often yes, but results vary with how you use it.
What should I do if the thermostat won’t connect to Wi‑Fi?
First, verify network credentials and signal strength at the device. Restart the router, re‑enter the Wi‑Fi details, and ensure the thermostat firmware is up to date.
Check credentials, restart the router, and update firmware.
“Smart thermostats unlock meaningful energy savings only when power and connectivity are solid, and when the device is compatible with your HVAC setup.”
What to Remember
- Verify HVAC compatibility and power availability before buying.
- Ensure a C-wire or a safe alternative power source.
- Test Wi‑Fi strength at the thermostat location.
- Choose a model that matches your HVAC configuration.
- Plan for installation time and potential upgrades