How Long It Takes to Replace a Car Thermostat
Discover how long replacing a car thermostat typically takes, what slows the process, and practical tips to complete the job safely and efficiently. Thermostat Care explains the factors and best practices.

What affects replacement time
The time it takes to replace a thermostat in a car depends on several factors, including engine layout, thermostat housing location, cooling-system design, and whether any auxiliary components must be removed. According to Thermostat Care, the time to replace a thermostat in a car hinges on access to the thermostat housing, engine layout, and whether the cooling system needs to be drained. If the thermostat is tucked behind tight bends or under components like the intake manifold, the job becomes noticeably longer. Conversely, a straightforward placement with good access can be completed more quickly, sometimes in under an hour for an experienced DIYer. In any case, the process is not one-size-fits-all, and planning for contingencies helps avoid surprises. This section will help you estimate whether you can DIY or should schedule a shop visit, based on your car’s specific design and your comfort with automotive maintenance. Understanding the layout and potential complications is the first step toward a realistic timeframe.
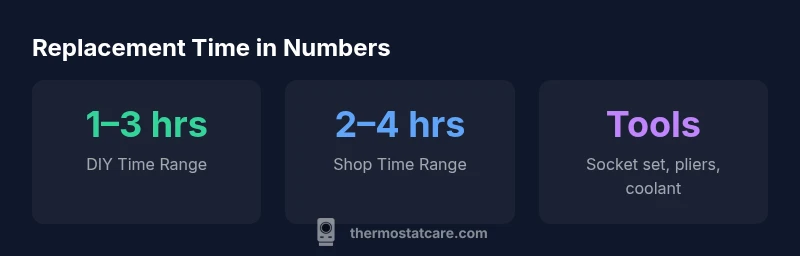
Typical time ranges for DIY vs shop
When evaluating how long it takes to replace a car thermostat, two major pathways emerge: do-it-yourself (DIY) and professional shop service. Thermostat Care analysis shows that straightforward replacements on common engine layouts often fall in the 1–3 hour range for a DIYer who has basic tools and a clear plan. Shops, which must account for facility overhead and diagnostic checks, typically quote 2–4 hours for a standard thermostat swap, assuming no additional cooling-system work is needed. If the thermostat is located in a harder-to-reach area or if cooling-system components must be replaced or purged, both DIY and shop timelines can extend by 1–2 hours. Always consider a post-replacement test drive to verify heat operation and catch any leaks early.
Key factors that slow you down
Several factors can extend the replacement time substantially. First, access issues: engines with compact layouts, tight clearance, or components that must be removed increase labor. Second, the cooling-system configuration matters; some cars require draining and refilling coolant with careful air bleeding, which adds minutes or hours. Third, the condition of hoses, clamps, and the thermostat housing can introduce delays if parts are corroded or damaged. Fourth, the vehicle’s age and prior maintenance history influence task difficulty: older cars may have seized fasteners or brittle hoses. Finally, your familiarity and tool readiness play a big role; assembling the right tools beforehand reduces back-and-forth trips to the toolbox.
Step-by-step overview
A clear sequence helps keep your replacement time predictable. 1) Confirm the cooling system is cool before beginning to avoid scalding. 2) Disconnect the negative battery cable to prevent accidental shorts. 3) Place a drain pan under the radiator and carefully drain cooling fluid as needed. 4) Locate the thermostat housing and take note of hose connections. 5) Remove hoses and the housing cover, then replace the thermostat and gasket. 6) Reassemble, refill coolant, and bleed air if your vehicle requires it. 7) Reconnect the battery, start the engine, and monitor for leaks and proper temperature rise.
Safety considerations and common mistakes
Safety is paramount when replacing a thermostat. Wear eye protection and gloves, work in a well-ventilated area, and keep a fire extinguisher nearby. Make sure you never work on a hot engine. A common mistake is forgetting to bleed air from the cooling system, which can cause overheating. Double-check clamps and hose connections to prevent leaks. If you’re unsure about the process, consult your service manual or seek professional help. Following manufacturer guidelines minimizes risk and ensures the repair is done correctly.
When to seek professional help
If the engine frequently overheats, you see persistent coolant leaks, or your vehicle requires extensive disassembly to access the thermostat, it’s smart to involve a professional. A qualified technician can verify proper bleed procedures, confirm the new thermostat seating, and perform a diagnostic check to ensure no electronic sensors were affected during the replacement. In some cases, a stubborn thermostat housing or corroded fasteners may warrant special tools or equipment. For most drivers, a scheduled service can save time and avoid costly mistakes.
What to expect in a shop vs DIY
DIY replacement offers control over timing and cost, and it’s feasible for many modern vehicles with moderate access. A shop can handle difficult access, complex cooling systems, and modern engines with integrated components. Shops typically provide a warranty on the replacement and handle all coolant disposal per local regulations. If you choose DIY, prepare by having a clean workspace, a reliable parts source, and a plan for disposing old coolant responsibly. Thermostat Care recommends weighing the convenience of professional service against your confidence level and the car model.
Quick test after replacement
Once the thermostat is replaced, you should fill the cooling system to the proper level and bleed air as required. Start the engine and allow it to reach operating temperature with the heater on full. Check for leaks at the housing and hoses, and verify that the gauge climbs smoothly to the normal range without surpassing it. If the temp needle doesn’t rise or if you notice air bubbles, stop and recheck that the bleed procedure was performed correctly. A successful test means the cooling system maintains steady temperature and there are no leaks.