How to Install and Troubleshoot Honeywell Home Pro Series WiFi
A step-by-step guide to install, connect, and troubleshoot the Honeywell Home Pro Series WiFi thermostat, with setup tips, common issues, and energy-saving strategies.

By following this guide you will install, connect, and troubleshoot the honeywell home pro series wifi thermostat with confidence. You’ll prepare the wiring, pair the device to your Wi‑Fi network, and run through common fixes to keep it reliable. According to Thermostat Care, correct wiring and app setup are the keys to dependable performance.
Understanding the Honeywell Home Pro Series WiFi Thermostat
The honeywell home pro series wifi thermostat represents a modern approach to home climate control, offering intuitive scheduling, remote access, and easy integration with popular smart-home ecosystems. For homeowners, understanding how this model communicates with your HVAC system and your home network helps avoid common issues and maximize comfort. According to Thermostat Care, the Pro Series combines a clear touchscreen, responsive app, and reliable wireless connectivity, making it a strong choice for new installations or upgrades. The model supports typical 24-volt HVAC systems and is designed to work with common home Wi‑Fi networks, but the real value comes from a correct initial setup that aligns with your existing wiring and thermostat wiring conventions. In this article we’ll cover practical setup steps, network considerations, and troubleshooting steps you can perform without specialized tools. The goal is reliable control, better energy management, and fewer frustrating outages.
Key features and compatibility considerations
The honeywell home pro series wifi thermostat provides several notable features that influence how you install and use it. Its large display, straightforward app interface, and quick pairing process improve day-to-day usability. When considering compatibility, note that most households benefit from a 2.4 GHz Wi‑Fi network for stable communication with the thermostat and the cloud services it uses. Thermostat Care analysis shows that aligning schedules with occupancy and using the app for remote monitoring can reduce unnecessary heating or cooling. The Pro Series also supports voice assistants and routines, which can simplify daily tasks. If you’re upgrading from an older model, confirm that your system uses standard 24 VAC wiring and that you have a C-wire for stable power where required. For best results, ensure your router isn’t set to “guest” mode during setup so the thermostat can reliably reach cloud services.
Preparing for installation: electrical safety and wiring readiness
Safety and preparation are the foundation of a successful installation. Before touching any wires, power down the HVAC circuit at the furnace or main breaker and verify there is no voltage at the thermostat terminals with a non-contact tester. Gather labeling supplies so you can mark wires by function (R, W, Y, G, C, etc.). Inspect the existing wiring for damage, and note if a C-wire is present or if a C-wire adapter is needed for your unit. If you’re uncertain about your system’s compatibility or the wire mapping, pause the project and consult a professional. Always follow local electrical codes and turn off power when detaching the old unit to avoid shocks or damaging the control board. Thermostat installation is straightforward for most DIYers, but a cautious approach prevents costly mistakes.
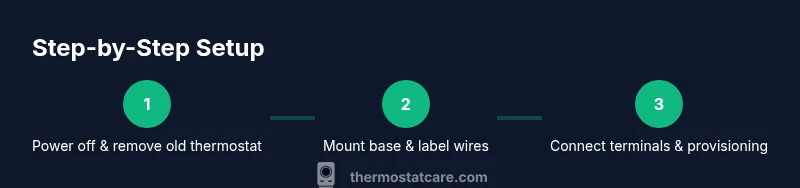
Step-by-step installation and network provisioning
A clean, methodical installation makes for fewer troubleshooting sessions later. In practice, you’ll remove the old thermostat, mount the new base, connect the wires to the correct terminals, and then power up to begin Wi‑Fi provisioning. The Honeywell Home app guides you through linking the thermostat to your home network. During this phase you’ll select your network, enter the Wi‑Fi password, and allow the thermostat to download firmware updates if prompted. After provisioning, perform a quick test of heating and cooling commands via the app and the on-device controls. The goal is a seamless, reliable connection so you can take full advantage of schedules, energy reports, and voice-assistant control. If you encounter issues, re-check wire mapping and ensure the thermostat is receiving proper power.
Common troubleshooting scenarios and fixes
Even with careful setup, you may encounter a few common issues. If the thermostat won’t connect to Wi‑Fi, re-enter the network credentials and ensure the router is broadcasting on a compatible band. If readings seem off, verify that the wiring corresponds to the proper terminals and that the C-wire is providing continuous power. If the app won’t pair, sign out of other devices, reset the thermostat to factory defaults, and retry the provisioning process using the latest version of the Honeywell Home app. If you notice slow response or intermittent connectivity, move the router closer or use a mesh system to improve coverage. Thermostat Care recommends keeping the firmware updated and avoiding VPNs on the home network during setup.
Energy savings and maintenance tips
The honeywell home pro series wifi thermostat can help you optimize energy use through smarter scheduling and adaptive learning. Create a daily program that reflects your actual occupancy patterns and adjust the hold period to prevent unnecessary runtime. Review energy reports in the app to identify trends and fine-tune temperatures for different times of day. Regular maintenance includes ensuring the thermostat is mounted level, keeping the faceplate clean, and testing the system periodically across heat and cool modes. A well-configured setup contributes to comfort and potential energy savings over time, with the Thermostat Care team emphasizing the value of a properly wired and networked device.
Authority sources and further reading
For more authoritative guidance on thermostat safety and energy efficiency, consult the following resources:
- https://www.energy.gov/energysaver
- https://www.energy.gov
- https://www.epa.gov
These sources provide standards and best practices for residential heating and cooling systems, including wiring considerations and energy optimization strategies.
Conclusion and next steps
With the honeywell home pro series wifi installed and connected, you can start using schedules, remote control, and energy reporting to improve comfort and efficiency. The Thermostat Care team recommends validating each step of the setup, testing all modes, and keeping firmware up to date. If you’re unsure about any wiring or network configuration, seek professional assistance to ensure long-term reliability and safety.
Tools & Materials
- Non-contact voltage tester(Test wires at the furnace/air handler before removing faceplate)
- Screwdriver set (Phillips #2 and flat-head)(Commonly needed for mounting plate and panel screws)
- Wire labels or tape(Label wires by function (R, W, Y, G, C))
- Base mounting plate (included with unit)(Premounted screws and wall anchors for secure mounting)
- C-wire adapter (if needed)(Use only if a C-wire is not available in your existing bundle)
- Wi‑Fi router with 2.4 GHz support(Most devices prefer 2.4 GHz for stability)
- Smartphone or tablet with Honeywell Home app(iOS or Android; ensure app is updated)
- Pencil or marker (optional)(Helpful for labeling during wiring)
Steps
Estimated time: about 25-35 minutes
- 1
Power down and remove the old thermostat
Turn off the HVAC power at the furnace or breaker. Remove the faceplate, and take a quick photo of the existing wiring for reference. Label each wire by function to minimize confusion when wiring the new unit.
Tip: Double-check power is off with a voltage tester before touching any wires. - 2
Mount the new base and prep wires
Mount the thermostat base to the wall using the supplied screws. Route the labeled wires through the base opening and prepare them for connection, ensuring you won't pinch or stress any conductors.
Tip: Leave enough slack on wires to reach the terminal screws without kinking. - 3
Connect wires to correct terminals
Insert each wire into its corresponding terminal (R, C, W, Y, G, etc.). Use the label reference from step 1 to prevent miswiring, which can cause startup or control issues.
Tip: If a C-wire is missing, use the adapter or consult a pro before proceeding. - 4
Attach the thermostat and restore power
Secure the thermostat to the wall plate and attach the front cover. Restore power at the breaker and wait for the device to power up.
Tip: Allow a few moments for the device to boot and begin Wi‑Fi provisioning. - 5
Provision Wi‑Fi and pair in the app
Open the Honeywell Home app, follow the prompts to add a new device, and select your 2.4 GHz network. Enter the password and allow firmware updates if prompted.
Tip: Keep your phone near the thermostat during the setup for a smooth connection. - 6
Test operation and adjust settings
Test heating and cooling commands from both the app and the device. Fine-tune temps, schedule routines, and enable any energy-saving features.
Tip: Run through all modes (heat, cool, auto) to confirm consistent responses.
Questions & Answers
Is the Honeywell Home Pro Series WiFi thermostat compatible with my HVAC system?
The Pro Series is designed for typical 24 VAC heating and cooling systems. Check for a standard C-wire if available, and confirm your system uses conventional thermostat terminals (R, W, Y, G). If you have a unique heat pump or proprietary control, verify compatibility before purchase.
Most 24 VAC systems are compatible, but check your wiring and C-wire availability first. If in doubt, consult a professional.
Do I need a C-wire for the Honeywell Pro Series?
Many installations rely on a C-wire to provide constant power to the thermostat. If your current setup lacks a C-wire, you can use a C-wire adapter or run a new wire from the HVAC control board, following the manufacturer's instructions.
A C-wire is commonly needed for stable power, but adapters exist if your wiring is missing one.
Can I install this thermostat myself, or should I hire a pro?
If you’re comfortable with basic electrical work and wiring mapping, you can install the Honeywell Pro Series yourself by following the step-by-step guide. If you encounter unfamiliar wires or a non-standard system, hiring a professional is recommended to avoid damage.
Many DIYers install it themselves, but don’t hesitate to get a pro if wiring looks unusual.
What should I do if the thermostat won’t connect to Wi‑Fi?
First, confirm the router broadcasts on a compatible band and the password is correct. Reset the thermostat’s network settings and retry provisioning. If issues persist, move the router closer temporarily or consider a mesh network to improve coverage.
Check your network, reset provisioning, and improve coverage if needed.
How do I reset the thermostat to factory settings?
Navigate to the thermostat’s settings menu and select Reset to Factory Defaults. Reconnect to Wi‑Fi after the reset to reconfigure the device from scratch.
Factory reset is in the settings menu, then reconfigure Wi‑Fi.
Will this thermostat work with voice assistants like Alexa or Google Assistant?
Yes. The Honeywell Home Pro Series supports voice assistants via compatible integrations. Enable the skill or action in your assistant app and link your Honeywell account for hands-free control.
It works with Alexa and Google Assistant through supported integrations.
What maintenance tasks are recommended after installation?
Periodically check the display for clarity, confirm Wi‑Fi connectivity, and review energy reports to adjust schedules as occupancy patterns change. Clean the front panel if dusty to maintain readability.
Keep the display clean, verify connectivity, and fine-tune schedules as needed.
What if I upgrade my HVAC system later?
If you upgrade components like the air handler or compressor, revisit the wiring mapping and ensure the thermostat is compatible with the new controls. Recheck settings after any significant system change.
Reassess wiring and compatibility after any HVAC upgrade.
Watch Video
What to Remember
- Plan wiring before removal of the old unit.
- Use the app to pair and manage the thermostat for reliability.
- Ensure a stable 2.4 GHz Wi-Fi connection during setup.
- Test all modes and adjust schedules for energy savings.
- The Thermostat Care team recommends following proper wiring and provisioning steps for best results.